
Christmas Lighting Made Easy
Essential Supplies
Supplies Used In Video
How to Program and Operate Your Digital Timer:
A Step-by-Step Guide
Introduction
Using a digital timer can make your home or business run smoother and save energy. Whether turning lights on automatically or setting precise on-off schedules, knowing how to operate your timer helps you get the most out of it. This guide covers how to reset the device, set the time, explore different modes, and create custom schedules for perfect automation.
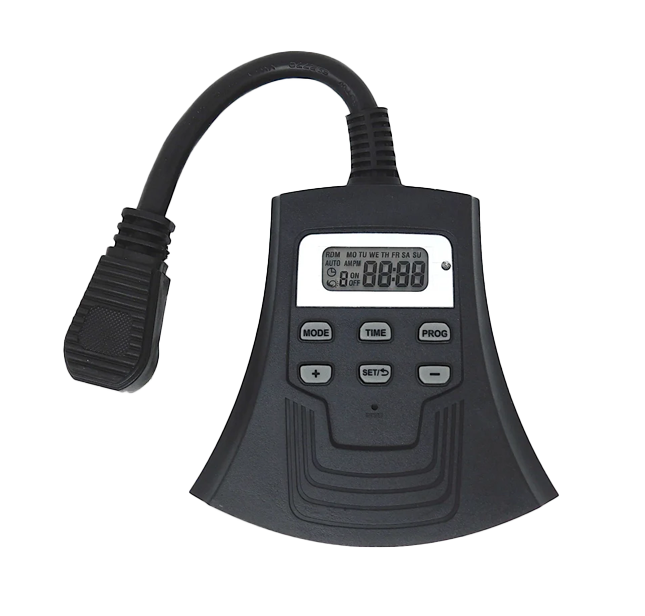
What is a Digital Timer?
A digital timer is a small device that controls electrical equipment based on scheduled times or light conditions. It usually has a display, buttons, and sensors to automate turning devices on and off. Many people use timers for lighting, watering gardens, or security systems, making life easier.
Understanding Your Digital Timer: Basic Features and Functions
Key Features to Know
- Reset Button: Clears all settings and restores factory defaults.
- Mode Selection: Your timer can switch between different modes like off, random, timer, or sensor-based.
- Schedule Programming: You can set multiple on/off times to match your needs.
- Photo Sensor: Detects daylight to automatically turn on or off lights with the auto photo cell mode. Some timers combine digital timings with light sensing for flexible automation.
Resetting Your Digital Timer for a Fresh Start
Sometimes, the timer malfunctions, or you want to clear previous schedules. Resetting helps resolve issues and prepares the device for new programming.
How to Perform a Reset
- Reset Button: Clears all settings and restores factory defaults.
- Mode Selection: Your timer can switch between different modes like off, random, timer, or sensor-based.
- Schedule Programming: You can set multiple on/off times to match your needs.
- Photo Sensor: Detects daylight to automatically turn on or off lights with the auto photo cell mode. Some timers combine digital timings with light sensing for flexible automation.
Setting the Current Date and Time
Hold down the “Time” button for a few seconds until the display switches to date or time setting mode. Use the plus (+) and minus (–) buttons to adjust.
Adjusting the Date and Time
- Set the day: Press “Set” and navigate to the correct weekday, like Wednesday.
- Choose AM or PM: Use the display toggle to select between morning and evening.
- Set the exact time: Use plus/minus to set the hours and minutes accurately, for example, 4:58 PM.
- Save Settings: Press “Set” again to confirm. The timer now has the correct date and time, ensuring all schedules line up correctly.
Exploring the Timer Modes
Switch between modes using the “Mode” button:
- Off: Lights remain off, no automatic control.
- Random: Lights turn on/off randomly, suitable for security.
- Timer: Runs scheduled on/off times based on user setup.
- Auto Timer with Photo Cell: Combines schedule with light sensing—lights turn on at dusk and off at a set time.
- Manual: User controls the lights manually, bypassing automation.
How to Cycle Through Modes
Press the “Mode” button repeatedly. The indicator lights or symbols show which mode is active. Familiarize yourself with these symbols, especially if you plan to use multiple modes regularly.
Practical Applications for Each Mode
- Use Off when no automation is needed.
- Choose Random for security lighting without a set schedule.
- Prefer Timer for regular on/off routines.
- Opt for Auto Timer with Photo Cell if you want lights to turn on at dusk automatically.
- Select Manual when you want direct control, like during maintenance.
Setting Up Auto Timer Mode
This mode schedules your lights at specific times:
- Enter programming by holding the “Set” button.
- You get options for six different settings—these are your schedules.
- For each, decide the “on” time (like 5:00 PM) and “off” time (lot of options, e.g., 5:00 AM).
- Select days for each schedule—every day or certain days.
- Save after setting times, and your timer will follow the schedule.
Using Photo Cell Sensor for Automatic Sunlight-Based Control
The auto photo cell mode uses light detection:
- Cover the sensor with your hand for a few seconds. The device will detect absence of daylight.
- When it senses darkness, it will turn on lights automatically.
- Removing your hand restores daylight reading, turning lights off again.
- Adjust dusk/dawn timing by programming specific hours when the lights should turn on or off based on the sensor.
Combining Modes for Better Automation
You can blend schedule programming with light detection. For example:
- Lights turn on at dusk using the photo cell.
- They turn off at a set time, like midnight.
- Or schedule them to turn on at 5 PM and off at 5 AM, regardless of light conditions.
Just make sure to choose the correct mode—auto timer with photo cell—for this combined operation.
Tips for Optimal Timer Operation and Troubleshooting
Ensuring Accurate Program Settings
Always double-check AM/PM when setting times. Confirm that all selected days are correct. Small mistakes can cause your schedule to malfunction.
Regular Maintenance and Checks
Periodically reset your timer to clear any glitches. Clean the sensor to ensure accurate light detection. Proper placement of the sensor ensures it gets good light exposure.
Troubleshooting Common Issues
- If the timer isn’t switching modes properly, verify the mode button and indicator lights.
- Incorrect on/off times? Recheck programming steps.
- Sensors not detecting light? Clean or reposition the sensor to avoid shadows or obstructions.
Conclusion
Mastering your digital timer means better control over your lights and devices. Remember to reset it before setting new schedules, understand each mode’s purpose, and carefully program the timings for your needs. Testing your setup periodically ensures everything runs smoothly. With a little practice, your timer becomes a simple tool to save energy, increase safety, and add convenience to daily life.
